Quite some time ago, I posted about my use of Cloudflare’s edge services to protect my WordPress installations. I still use and recommend Cloudflare as a frontend to all of your public facing (or even not public facing, future post coming) web assets. Even on the free plan, the out of the box WAF provides a good security layer and the edge CDN and optimization services speed things up.
Over time, I’ve evolved the way I protect my site with Cloudflare, so I thought I would share. This will not be a detailed technical writeup, but I’ll post links to the relevant Cloudflare docs.
The Basics: Cloudflare Access
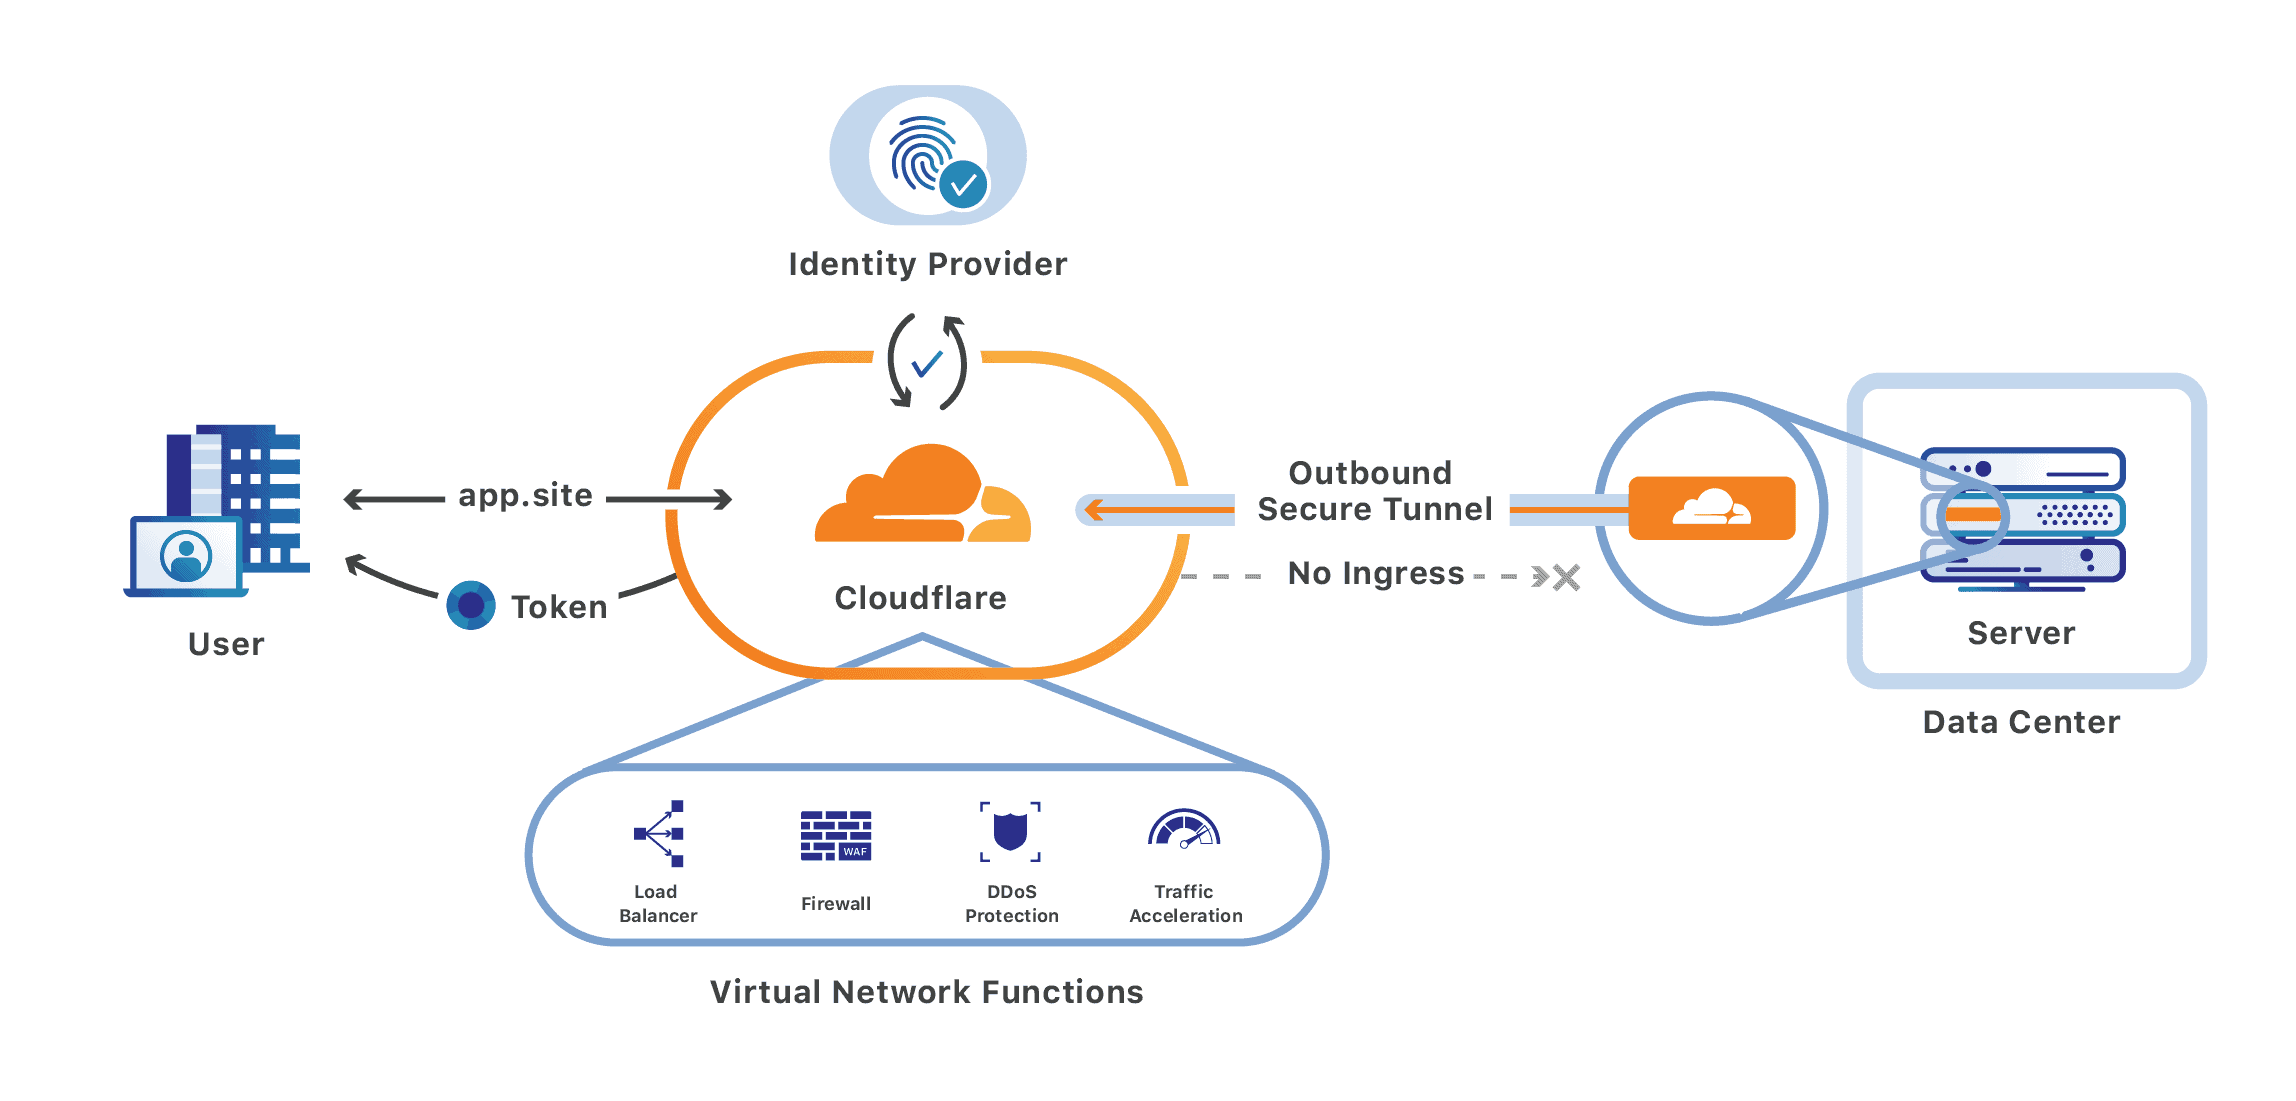
First things first, what is Cloudflare Access? Cloudflare sums it up pretty well, Access is a Zero Trust Network Access (ZTNA) product. Essentially, because you’re accessing my site via Cloudflare instead of directly interacting with my server, they are in a unique position to do some fun stuff. In this case, Access provides rules based access control that let me allow anyone to access domkirby.com but require authentication to access domkirby.com/wp-admin. That’s pretty much all there is to it.
When you access my site, you’re going first to Cloudflare and hitting some important rules engines. This is what the architecture looks like:

Image: Cloudflare
Let’s Set it Up
Okay, neat architecture, right? But how hard is it to setup? It isn’t hard at all. First off, you’ll need to sign up for Cloudflare Zero Trust (free for 50 users). Once you have an account, follow their guidance for first setup.
Setup Identify
Once you have a Cloudflare Zero Trust account, you need to setup an identify provider. To do so, simply follow their guides for Azure AD, Okta, Generic SAML, or whatever your identity provider is. If you don’t have an IdP, Cloudflare does allow for an email-based logon, just make sure your email account is secure! Once you have this setup, you’re ready to add your first application.
Add an Access App
Now that we have identity all setup, we need to tell Cloudflare about our self-hosted application. This is pretty straightforward, but you’ll need to play with the right way to setup your access policy. I personally use an AAD group, but you could even keep it as simple as matching your username.
- Follow these steps to build an application out
- When setting your URL, you want to protect the path of /wp-admin! If you leave the path blank, Cloudflare will require authentication to access anything on your website.

If you are protecting an entire domain, than you DO want to leave the path blank.
Once you have your app and policy configured, test it out by going to your wp-admin path. Cloudflare should force you to logon before letting you go there.
A Step Further: Integrating Authentication
This part is optional, but it is nice. At this point, we’ve used Cloudflare access to restrict network access to yoursite/wp-admin. Great! However, our logon flow is a bit… clunky. We have to login to Cloudflare and then login again to get into WordPress.
Thankfully, Access has built-in functionality to pass on Authentication information securely. When you sign on, a JSON Web Token (JWT) is issued and stored in your browser. This JWT is signed by a key that Cloudflare manages and rotates for you, so we can verify it and use it to log on to WordPress. Essentially, Cloudflare issues something that looks like the below, and we can use that to make sure you are you:
eyJhbGciOiJIUzI1NiIsInR5cCI6IkpXVCJ9.eyJzdWIiOiJub3lvdSIsIm5hbWUiOiJJIGJldCB5b3UgdGhvdWdodCB0aGlzIHdhcyBhIHJlYWwgdG9rZW4gbHVseiIsImlhdCI6MTUxNjIzOTAyMn0.C51roh37CJskGoBmBciwO03EMHv6f2xA0_EPAnyEaWg
I’ve chosen to accomplish this using a plugin: Auto Login with Cloudflare. This plugin looks for the presence of the Cloudflare token, verifies it using the public key side of the keypair, and then (if things check out) uses the claims to automatically authenticate you to WordPress. With this method, I’m automatically logged into WordPress after claims are cryptographically verified.
That’s it! If you need some help with this, reach out on LinkedIn. If you lock yourself out of WordPress, deleting the app inside Cloudflare will make the problem go away, and you can just start over.


